
You can find tons of articles and guides on the web regarding different loyalty programs and how they help retain customers in the long run. I agree with them and have experienced the magic of automatic loyalty programs with the Shopify stores that we have built for our clients.
With the announcement in May that Shopify Flow becomes available to all plans except Basic, Shopify now offers many more options to automate time-consuming processes.
In this article we will look into following 6 easy steps on how to create an automatic loyalty program with Shopify Flow:
- Step 1: Plan the loyalty program itself for your store
- Step 2: Add loyalty tier tags to one customer
- Step 3: Create customer segments to group your clients
- Step 4: Install Shopify Flow app to your store
- Step 5: Choose workflow in Shopify flow app
- Step 6: Add program benefit rules to your store
1. Plan the loyalty program itself for your store
We will focus on a tiered customer loyalty program that is usually based on customer lifetime spent value or the number of orders made metric and customers get different benefits depending on their tier.
This system gives customers a goal to reach. The higher their tier, the better rewards they’ll receive. You could offer free shipping, exclusive discounts other different kinds of benefits based on a tier to which the customer belongs.
For this example, I will create three tiers Bronze VIP, Silver VIP, and Gold VIP with the following automatic logic:
- When a customer’s lifetime spent value reaches 550$, he will be automatically added to the Bronze VIP tier.
- After reaching 1500$, he will be automatically removed from the Bronze VIP tier and added to the Silver VIP tier.
- Finally reaching 2500$, he will be automatically removed from the Silver VIP tier and added to the Gold VIP tier.
What will customers in these segments get as a benefit in my loyalty program example?
- Bronze VIP – always free shipping
- Silver VIP – always free shipping and 10% off from all orders
- Gold VIP – always free shipping and 20% off from all orders
2. Add loyalty tier customer tags to one client
After you are done with the planning your would need to add all tiers to one test customer. By doing this you can select the tags in Step 3 when creating customer segments.
Check the next video where we show how to add tags to a customer.
3. Create customer segments to group your clients
In this step you will be creating the actual segments were customers will be automatically added to. Later you can add different benefits and discounts for customer segments.
In the video you can see that I could select customer tags that I created in previews step.
4. Install Shopify Flow app to your store
Shopify Flow could previously be used only by the Shopify+ stores, but in May 2022 it was made available of all Shopify plans besides the Basic plan.
You can add Shopify Flow to your store from the Shopify app store here.
5. Choose workflow in Shopify Flow app
Now when you have added Shopify Flow you can also choose and install “Organize customers by lifetime spend tiers” workflow template to your store.
As you can see this automatic process will do all the needed customer tag changes based on the customer life time value. Make sure you change life time value amounts (you can do it after installing the template) in the workflow based on your own loyalty program.
6. Add program benefit rules to your store
Now the last this is to add the actual benefits what customers will receive if they belong to a certain customer segment in you Shopify store. At the moment you can’t yet make automatic discount codes for customer segments, but hopefully it will be added to Shopify soon.
For my Bronze tier, I added always free shipping code like this.
Make sure you select “Shipping discounts” for “Combinations” like I do in the video. This setting will allow multiple discount code usage for Silver and Gold tier customers.
My Silver customers will get the following order discount code.
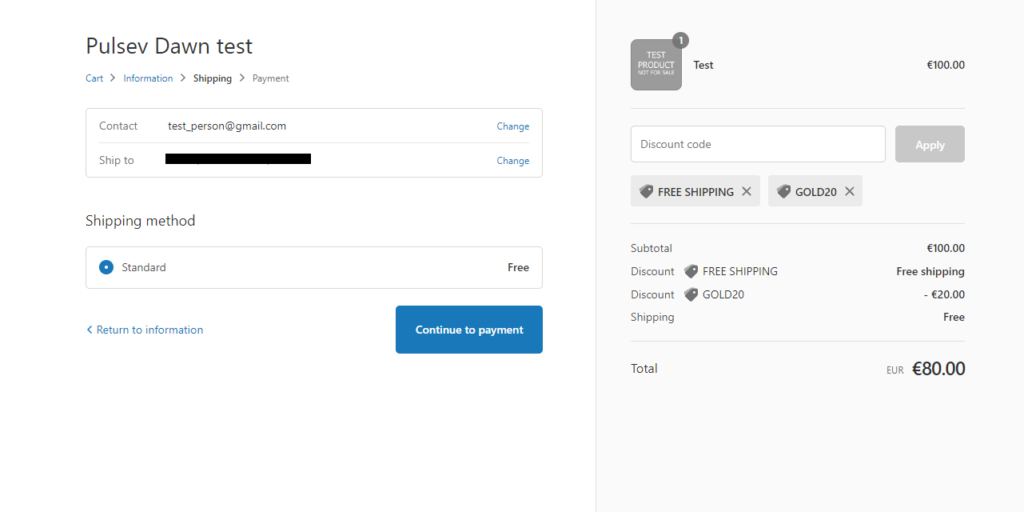
And finally Gold tier customers will get pretty much same discount code logic like Silver, but with larger discount percentage.
It’s important to let your loyalty program participants know that they have to insert actual discount codes to checkout to receive the benefits and they have to use the same e-mail address while ordering. Shopify recognizes unique customers based on their e-mail addresses.
If everything is done correctly then customer should be able to insert discount codes in checkout and it should look something like this.
I hope you found this article helpful and that it makes your Shopify business work smoother. If yes, then you can by buying me a coffee in exchange 🙂
